Realtime Drawing by using WebSocket and FabricJS

A developer who writes somethings useful.
By using Channel and FebricJS, I've made a real-time drawing sample.
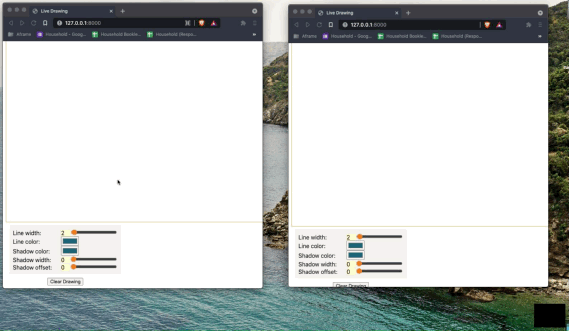
Looks cool, isn't it? You can find complete implemented example at github/priyankatgit/realtime_draw_websocket
FebricJS
Fabric.js is a powerful and simple Javascript HTML5 canvas library· Fabric provides interactive object model on top of canvas element
What is WebSocket?
WebSocket: WebSocket is bidirectional, a full-duplex protocol that is used in the same scenario of client-server communication, unlike HTTP it starts from ws:// or wss://. It is a stateful protocol, which means the connection between client and server will keep alive until it is terminated by either party (client or server). after closing the connection by either of the client and server, the connection is terminated from both the end.
Check this reference to know the difference between HTTP and WebSocket in detail.
For the WebSocket implementation, we need a client-server architecture and I'm using the Django web framework to establish full-duplex communication channels.
Channel is the python package that extends Django asynchronous requests and gives out-of-the-box functionality to handle long-lived connections.
So, before diving further let me divide the channel into three simple steps to establish a socket connection.
- Routing setup - It's similar to Django URL configuration
- Defining consumer - Where business logic lives
- Setup channel Layer - Communication bridge across different instances
1. HTTP and WebSocket routing
In a simple term, we need to first assign a job to handle regular HTTP requests to Django ASGI's application and Webscoket connection to the channel handler.
from django.core.asgi import get_asgi_application

application = ProtocolTypeRouter({
    "http": get_asgi_application(),
    "websocket": AuthMiddlewareStack(
        URLRouter(
            draw.routing.websocket_urlpatterns
        )
    ),
})
websocket_urlpatterns = [
    re_path(r'ws/draw/(?P<room_name>\w+)/$', consumers.DrawConsumer.as_asgi()),
]
URLRouter just contains the list of URL patterns that are mapped to the consumers. You can compare the consumer to the Django view.
2. Define consumer
The consumer is just a list of the derived function from the WebsocketConsumer or AsyncWebsocketConsumer. These functions are called automatically when the event happens.
class MyConsumer(AsyncWebsocketConsumer):
    async def connect(self):
        self.room_name = self.scope['url_route']['kwargs']['room_name']

        // Join the group
        await self.channel_layer.group_add(
            self.room_name,
            self.channel_name
        )

        await self.accept()

    async def disconnect(self, close_code):
        # Exit from the group
        await self.channel_layer.group_discard(
            self.room_name,
            self.channel_name
        )

   // Receive message from WebSocket
    async def receive(self, msg):

        // Send message to all member of group
        await self.channel_layer.group_send(
            self.room_name,
            {
                'type': 'foo',
                'message': msg
            }
        )

    // Receive the delegated message
    async def foo(self, event):
        pass
Connect Event
Connect event is called when a socket connection is established without an error and every connection is given to a unique random name and that value is assigned tochannel_name.
self.room_name is a group name and by using group_add API, we can make a group that has multiple connection(channel_name) details.
Receive Event
When any message is posted to a particular group, this event is triggered. We can use group_send API further and the same message can be delivered to all members using the group name.
In this example, the group name is stored in the self.room_name variable.
Disconnect Event
This event is called when a connection is dropped either by the client or by the server.
3. Define channel layer
The Channel layer is used to persist messages which are passed between different instances.
Redis is used as a message broker in the backend and it is recommended to use in Production. It is required to install channels_redis package for the Redis channel layer.
However, In-Memory Channel Layer can also be used in the development mode.
CHANNEL_LAYERS = {
    'default': {
        'BACKEND': 'channels_redis.core.RedisChannelLayer',
        'CONFIG': {
            "hosts": [('localhost', 6379)],
        },
    },
}
Let move to the client-side
Once server configuration is done, we can initiate Websocket connection from the browser as follow:
const socketConnection = new WebSocket(
    "ws://" + window.location.host + "/ws/draw/free_draw/"
 );
Notice that /ws/draw/free_draw/ is matched to the pattern which is defined in the
URL pattern list where free_draw is group name in which everybody else will be joined.
onmessage event will be triggered if anybody will send the message in the "free_draw" group.
socketConnection.onmessage = function (e) { }
Send API can be used to post a message to all joined members to the group "free_draw"
socketConnection.send();